The NVIDIA ConnectX Virtual Protocol Interconnect (VPI) series network interface cards (NICs)—including models such as ConnectX-4, ConnectX-5, ConnectX-6, ConnectX-7, and ConnectX-8 (commonly abbreviated as CX-4/5/6/7/8)—represent a rare class of dual-mode adapters in the industry. A single card enables seamless switching between InfiniBand (IB) and Ethernet physical networks without hardware replacement. This versatility supports RDMA-enabled, ultra-low-latency environments in high-performance computing (HPC) and AI clusters when operating in IB mode, while also integrating effortlessly into traditional data center Ethernet infrastructures. This approach maximizes investment protection and facilitates smooth network evolution.
This guide focuses on the 200G CX-6 NIC as an example, providing a detailed, step-by-step process for transitioning from InfiniBand mode to Ethernet mode (with the transport layer utilizing the RoCE v2 protocol). The host operating system is CentOS 7. These instructions are applicable to similar ConnectX VPI models and can enhance configurations for NVIDIA ConnectX Ethernet switching, InfiniBand to RoCE v2 migration, and dual-mode NIC setup.
Prerequisites
- A compatible NVIDIA ConnectX VPI NIC installed in the host system.
- Mellanox Firmware Tools (MFT) package installed, including mst and mlxconfig.
- Root access to the CentOS 7 host.
- Basic familiarity with Linux command-line operations.
Step 1: Start the Mellanox Software Tools Service
Initiate the MST service on the host to enable device management:
text
systemctl start mst
Step 2: Verify NIC Device Status
Check the status of the Mellanox devices:
text
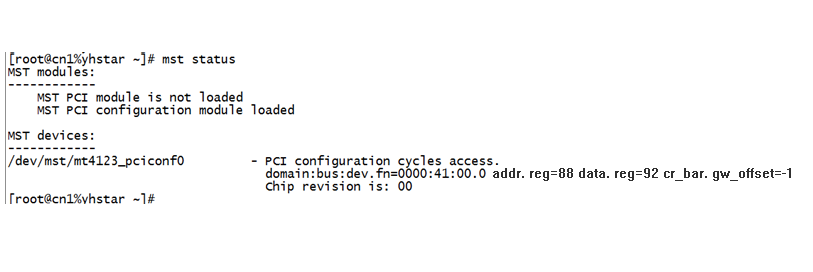
mst status
The output will identify the VPI NIC device, typically displayed as /dev/mst/mt4123_pciconf0 (or a similar identifier based on your hardware). Refer to the example in Image 1 for reference.
Step 3: Query Current NIC Configuration
Use the mlxconfig tool to inspect the link type:
text
mlxconfig -d /dev/mst/mt4123_pciconf0 q
This command reveals the current link type for each port: 1 indicates InfiniBand (IB), while 2 indicates Ethernet. In the example shown in Image 2, Port 1 (P1) is configured for Ethernet; proceed to Step 4 if switching to IB is required instead.

Step 4: Set the Desired Link Type
Apply the configuration change for Port 1 (P1). Replace the device path as needed based on your mst status output.
To switch to Ethernet mode:
mlxconfig -d /dev/mst/mt4123_pciconf0 set LINK_TYPE_P1=2
To switch to InfiniBand mode:
mlxconfig -d /dev/mst/mt4123_pciconf0 set LINK_TYPE_P1=1
Step 5: Reboot the Host
Restart the system to apply the firmware changes:
text
reboot
Step 6: Configure Ethernet Port IP Address
After rebooting in Ethernet mode, identify the interface name:
text
ifconfig -a
Create or edit the configuration file in /etc/sysconfig/network-scripts/ (e.g., ifcfg-ethX, replacing ethX with the actual interface):
text
DEVICE=ethXTYPE=EthernetBOOTPROTO=staticIPADDR=192.168.1.100 # Replace with your desired IPNETMASK=255.255.255.0GATEWAY=192.168.1.1ONBOOT=yes
Restart the network service:
text
systemctl restart network
Step 7: Inspect and Adjust Port Settings with ethtool
Verify port details using the ethtool utility:
Check driver information:
ethtool -i ethX
Set speed to 50 Gb/s, full duplex, and disable autonegotiation (example):
ethtool -s ethX speed 50000 duplex full autoneg off
Additional options are available via ethtool –help. This step is crucial for optimizing ConnectX NIC port speed configuration in Ethernet environments.
Step 8: Confirm Operational Mode
Validate the port’s mode (IB or RoCE v2) with the following command (replace mlx5_0 with your device):
text
cma_core_mode -d mlx5_0 -p 1
The output in Image 3 confirms RoCE v2 mode, indicating a successful transition to Ethernet.

Conclusion
Your CX-6 NIC is now fully operational in Ethernet mode with RoCE v2 support. This process ensures minimal downtime and leverages the full potential of NVIDIA’s VPI technology for HPC to data center network migration. For advanced RoCE v2 tuning, RDMA performance benchmarking, or troubleshooting ConnectX series issues, consult NVIDIA’s official documentation or consider professional network consulting services.
Related Products:
-
 NVIDIA NVIDIA(Mellanox) MCX515A-CCAT SmartNIC ConnectX®-5 EN Network Interface Card, 100GbE Single-Port QSFP28, PCIe3.0 x 16, Tall&Short Bracket
$715.00
NVIDIA NVIDIA(Mellanox) MCX515A-CCAT SmartNIC ConnectX®-5 EN Network Interface Card, 100GbE Single-Port QSFP28, PCIe3.0 x 16, Tall&Short Bracket
$715.00
-
NVIDIA NVIDIA(Mellanox) MCX653106A-ECAT-SP ConnectX-6 InfiniBand/VPI Adapter Card, HDR100/EDR/100G, Dual-Port QSFP56, PCIe3.0/4.0 x16, Tall Bracket
$1100.00
-
NVIDIA NVIDIA(Mellanox) MCX653105A-ECAT-SP ConnectX-6 InfiniBand/VPI Adapter Card, HDR100/EDR/100G, Single-Port QSFP56, PCIe3.0/4.0 x16, Tall bracket
$965.00
-
NVIDIA NVIDIA(Mellanox) MCX516A-CCAT SmartNIC ConnectX®-5 EN Network Interface Card, 100GbE Dual-Port QSFP28, PCIe3.0 x 16, Tall&Short Bracket
$985.00
-
NVIDIA MCX623106AN-CDAT SmartNIC ConnectX®-6 Dx EN Network Interface Card, 100GbE Dual-Port QSFP56, PCIe4.0 x 16, Tall&Short Bracket
$1200.00
-
NVIDIA NVIDIA(Mellanox) MCX653105A-HDAT-SP ConnectX-6 InfiniBand/VPI Adapter Card, HDR/200GbE, Single-Port QSFP56, PCIe3.0/4.0 x16, Tall Bracket
$1400.00
-
NVIDIA NVIDIA(Mellanox) MCX653106A-HDAT-SP ConnectX-6 InfiniBand/VPI Adapter Card, HDR/200GbE, Dual-Port QSFP56, PCIe3.0/4.0 x16, Tall Bracket
$1600.00
-
NVIDIA NVIDIA(Mellanox) MCX75510AAS-NEAT ConnectX-7 InfiniBand/VPI Adapter Card, NDR/400G, Single-port OSFP, PCIe 5.0x 16, Tall Bracket
$1650.00
-
NVIDIA NVIDIA(Mellanox) MCX75310AAS-NEAT ConnectX-7 InfiniBand/VPI Adapter Card, NDR/400G, Single-port OSFP, PCIe 5.0x 16, Tall Bracket
$2200.00
-
NVIDIA B3140H BlueField-3 8 Arm-Cores SuperNIC, E-series HHHL, 400GbE (Default Mode)/NDR IB, Single-port QSFP112, PCle Gen5.0 x16, 16GB Onboard DDR, Integrated BMC, Crypto Disabled
$4390.00