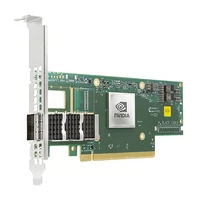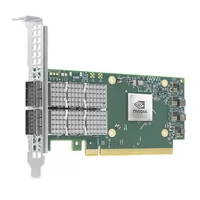

A data center team installs an NVIDIA ConnectX adapter in an AI server and connects it to an Ethernet switch. Linux detects the PCIe device, the NVIDIA driver loads successfully, and the optical module is present—but the Ethernet link remains down.
In many cases, the problem is not the cable or switch. The ConnectX port is still configured for InfiniBand.
Selected NVIDIA ConnectX Virtual Protocol Interconnect, or VPI, adapters can operate in either InfiniBand or Ethernet mode. This allows the same network card to support an InfiniBand AI fabric today and a RoCE v2 Ethernet network later without replacing the hardware.
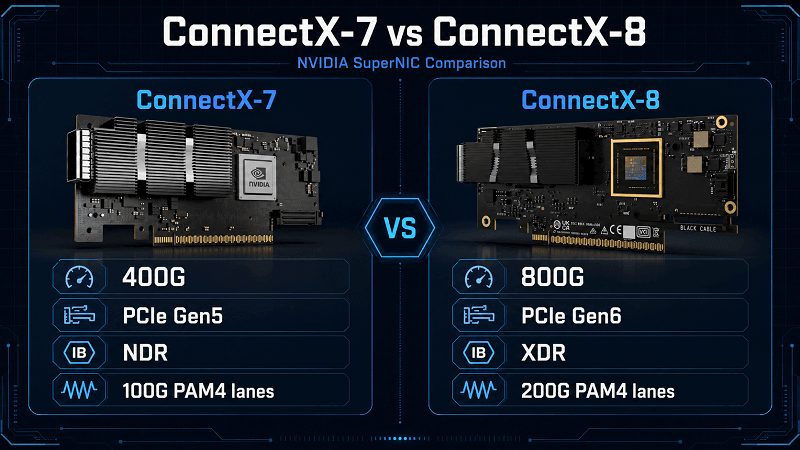
This flexibility is especially important for ConnectX-7 and ConnectX-8. ConnectX-7 is widely deployed in 400G NDR InfiniBand and 400GbE networks, while ConnectX-8 targets 800G XDR InfiniBand and next-generation 800GbE AI infrastructure.
The basic switching process is similar on both generations. However, ConnectX-8 may require additional attention to port layout, PCIe bandwidth, connector type, and 800G optics.
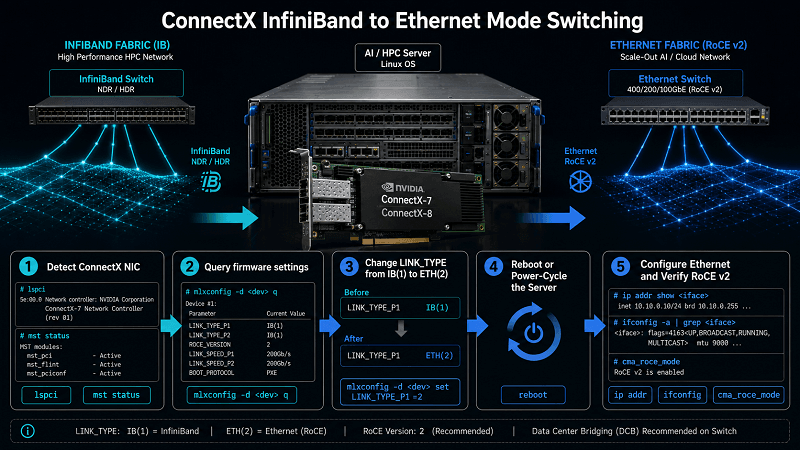
This guide explains how to switch a supported ConnectX-7 or ConnectX-8 adapter from InfiniBand to Ethernet mode, configure the Linux interface, verify RoCE v2, and troubleshoot common 400G and 800G link problems.
ConnectX-7 vs ConnectX-8: Key Differences
ConnectX-7 and ConnectX-8 share the same general VPI architecture, but they are designed for different network generations.
| Feature | ConnectX-7 | ConnectX-8 |
| Maximum bandwidth | Up to 400Gb/s | Up to 800Gb/s |
| InfiniBand generation | NDR | XDR |
| Ethernet capability | Up to 400GbE | Up to 800GbE or dual 400GbE |
| Host interface | PCIe Gen5 x16 | PCIe Gen6-class connectivity |
| Common NIC connector | OSFP or dual QSFP112 | OSFP-RHS or dual QSFP112 |
| Typical GPU platforms | H100, H200, B200 | B300, GB300 and newer platforms |
| Configuration complexity | Usually a standard link-type change | May also require port-layout changes |
For most ConnectX-7 VPI adapters, switching modes mainly involves changing LINK_TYPE_P1 or LINK_TYPE_P2 with mlxconfig, followed by a reboot.
ConnectX-8 follows the same general principle, but the exact process depends more heavily on the adapter model. Moving between one 800G port and two 400G ports may require additional port-splitting or physical-function settings.
Confirm That the ConnectX Card Supports VPI
Not every product carrying the ConnectX name supports both InfiniBand and Ethernet.
Before changing any setting, verify:
- The full NVIDIA ordering part number
- Whether the adapter is a VPI model
- The number and type of physical ports
- Supported InfiniBand and Ethernet speeds
- Current firmware and PSID
- Available mlxconfig parameters
- Required switch, cable, and transceiver configuration
A ConnectX family name alone is not enough. Some ConnectX-7 and ConnectX-8 variants may be Ethernet-only or use model-specific configurations.
If LINK_TYPE_P1 or LINK_TYPE_P2 does not appear in the mlxconfig output, the adapter may not support a conventional VPI mode change.
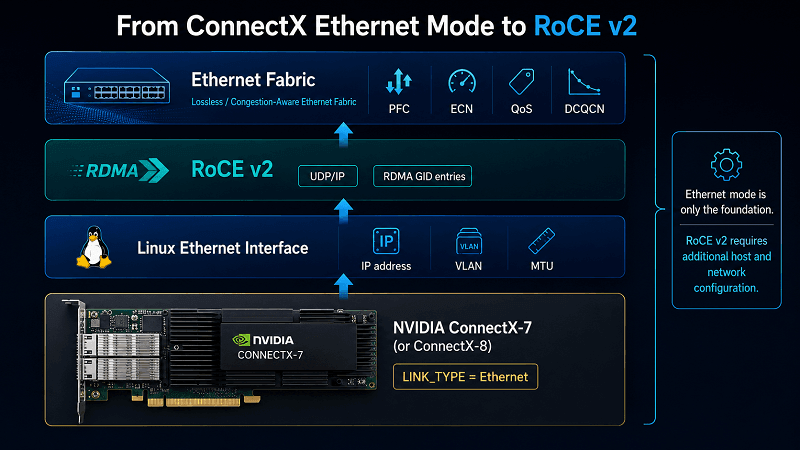
Ethernet Mode Is Not the Same as RoCE v2
Changing the ConnectX port to Ethernet mode changes the link layer. It allows the adapter to connect to an Ethernet switch and appear as a Linux Ethernet interface.
RoCE v2 is an RDMA transport that operates over UDP/IP. A complete RoCE v2 deployment also requires:
- An IP address
- Valid RoCE v2 GID entries
- RDMA drivers and userspace tools
- Correct MTU
- Compatible VLAN and routing configuration
- Proper switch QoS
- Congestion control such as PFC and ECN
The firmware change enables Ethernet. The host and network configuration enable RoCE v2.
Prerequisites
Prepare the following before changing the ConnectX configuration:
- A supported ConnectX-7 or ConnectX-8 VPI adapter
- Root or sudo access
- NVIDIA Firmware Tools, including mst and mlxconfig
- A compatible mlx5_core driver
- RDMA utilities
- A maintenance window
- A compatible Ethernet switch port
- Correct optics, AOC, or DAC
- IP, VLAN, gateway, and MTU information
- A backup of the current configuration
The examples below use:
MST device: /dev/mst/mt4129_pciconf0
RDMA device: mlx5_0
Ethernet interface: ens5f0np0
Port: 1
Replace these values with the names detected on your system.
Step 1: Identify the ConnectX Adapter
Confirm that Linux detects the NIC:
lspci -nn | grep -i -E “Mellanox|NVIDIA”
Check the active driver:
lspci -k -s <PCI-address>
Look for:
Kernel driver in use: mlx5_core
You can also check the loaded modules:
lsmod | grep mlx5
Typical modules include:
mlx5_core
mlx5_ib
Record the PCIe address, ConnectX generation, ordering part number, firmware version, and current interface names.
Step 2: Start NVIDIA Firmware Tools
Start the MST driver:
sudo mst start
Then display the detected devices:
sudo mst status -v
A ConnectX-7 device may appear similar to:
DEVICE_TYPE MST PCI
ConnectX7 /dev/mst/mt4129_pciconf0 5e:00.0
A ConnectX-8 card will use a different device identifier. Copy the exact /dev/mst/ path for the next steps.
Step 3: Query the Current Link Type
Run:
sudo mlxconfig -d /dev/mst/mt4129_pciconf0 query
To display the most relevant settings:
sudo mlxconfig -d /dev/mst/mt4129_pciconf0 query \
| grep -E “LINK_TYPE|SPLIT|PORT|NUM_OF_PF”
A typical ConnectX-7 VPI result may show:
LINK_TYPE_P1 IB(1)
LINK_TYPE_P2 IB(1)
The common values are:
- 1 means InfiniBand.
- 2 means Ethernet.
Another possible configuration is:
LINK_TYPE_P1 ETH(2)
LINK_TYPE_P2 IB(1)
This means Port 1 is Ethernet and Port 2 is InfiniBand.
For ConnectX-8, inspect the complete output. Additional parameters may control port splitting, physical functions, or the number of active links.
Step 4: Back Up the Current Configuration
Save the current firmware settings before making changes:
sudo mlxconfig -d /dev/mst/mt4129_pciconf0 query \
> connectx-config-before-change.txt
Save the firmware information:
sudo flint -d /dev/mst/mt4129_pciconf0 query \
> connectx-firmware-before-change.txt
Record the current network and RDMA interfaces:
ip -br link > network-interfaces-before-change.txt
rdma link show > rdma-links-before-change.txt
This backup is useful if the interface names or port mappings change after rebooting.
Step 5: Switch ConnectX-7 to Ethernet Mode
To switch Port 1 of a supported ConnectX-7 VPI adapter to Ethernet:
sudo mlxconfig -d /dev/mst/mt4129_pciconf0 \set LINK_TYPE_P1=2
Confirm the change when prompted.
To switch both ports to Ethernet:
sudo mlxconfig -d /dev/mst/mt4129_pciconf0 \set LINK_TYPE_P1=2 LINK_TYPE_P2=2
To keep Port 1 in Ethernet and Port 2 in InfiniBand:
sudo mlxconfig -d /dev/mst/mt4129_pciconf0 \set LINK_TYPE_P1=2 LINK_TYPE_P2=1
To restore Port 1 to InfiniBand:
sudo mlxconfig -d /dev/mst/mt4129_pciconf0 \set LINK_TYPE_P1=1
For most ConnectX-7 VPI deployments, changing the LINK_TYPE value is the main firmware modification required.
Step 6: Switch ConnectX-8 to Ethernet Mode
Start with the same discovery process:
sudo mst startsudo mst status -vsudo mlxconfig -d /dev/mst/<connectx8-device> query
If the exact ConnectX-8 model exposes LINK_TYPE_P1, Ethernet mode may use the same syntax:
sudo mlxconfig -d /dev/mst/<connectx8-device> \set LINK_TYPE_P1=2
However, this command may not be sufficient for every ConnectX-8 adapter.
ConnectX-8 may support several physical configurations:
- One 800G XDR InfiniBand port
- One 800GbE port
- Two 400GbE ports
- Dual QSFP112 links
- Split-port or multi-function configurations
Moving from one 800G port to two 400G Ethernet links may require additional port-splitting or physical-function settings. Review the complete mlxconfig output and the instructions for the exact ConnectX-8 ordering part number.
ConnectX-8 C8180
The ConnectX-8 C8180 is generally associated with a single OSFP-RHS interface and maximum single-link bandwidth.
Before configuring it for Ethernet, confirm:
- Whether the target speed is 800GbE or a lower rate
- Whether the server provides sufficient PCIe bandwidth
- Whether the module is a single-port OSFP-RHS design
- Whether the switch supports the same lane structure
- Whether a port-width change is required
Do not install a twin-port OSFP-IHS module designed for a switch in an OSFP-RHS NIC cage.
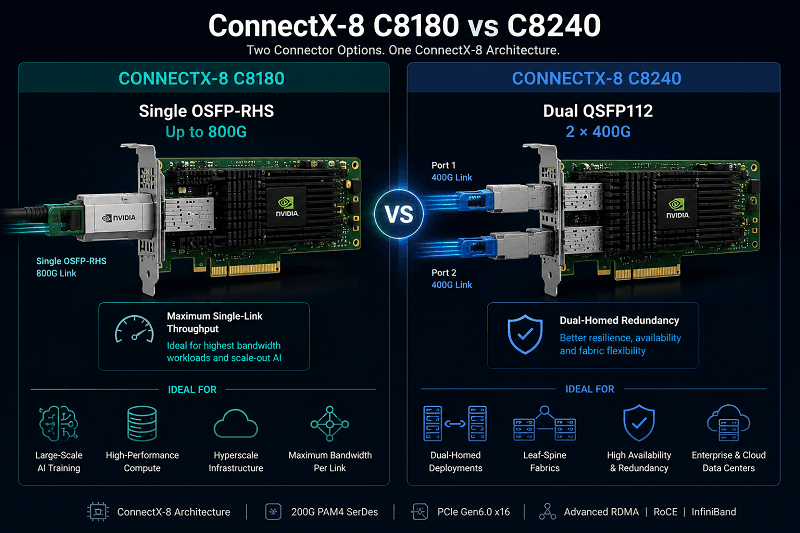
ConnectX-8 C8240
The ConnectX-8 C8240 uses a dual-QSFP112 design and is more suitable for:
- Two independent 400G connections
- Dual-homed server connectivity
- Redundant Ethernet fabrics
- Existing QSFP112 cabling
Each port must be configured according to the required Ethernet or InfiniBand topology.
Step 7: Reboot or Power-Cycle the Server
Apply the new configuration:
sudo reboot
A normal reboot is often sufficient for a ConnectX-7 link-type change.
For ConnectX-8, especially after changing port width, port splitting, or physical functions, a full power cycle may be required.
After startup, run:
sudo mst startsudo mlxconfig -d /dev/mst/<device> query \
| grep -E “LINK_TYPE|SPLIT|PORT|NUM_OF_PF”
Confirm that the protocol and physical port layout match the intended Ethernet configuration.
Step 8: Verify the Active Ethernet Link Layer
Check the active link layer:
cat /sys/class/infiniband/mlx5_0/ports/1/link_layer
Expected output:
Ethernet
You can also run:
ibv_devinfo -d mlx5_0
Look for:
link_layer: Ethernet
This confirms that the firmware change is active. The physical link may still remain down if the switch, transceiver, speed, FEC, or breakout settings do not match.
Step 9: Identify and Configure the Ethernet Interface
List the available network interfaces:
ip -br link
Map the RDMA device to the Ethernet interface:
ibdev2netdev
Example:
mlx5_0 port 1 ==> ens5f0np0 (Down)
For a temporary IP configuration:
sudo ip link set ens5f0np0 upsudo ip address add 192.168.10.10/24 dev ens5f0np0
For NetworkManager:
sudo nmcli connection add \
type ethernet \
ifname ens5f0np0 \
con-name connectx-ethernet \
ipv4.method manual \
ipv4.addresses 192.168.10.10/24 \
ipv4.gateway 192.168.10.1
Activate the connection:
sudo nmcli connection up connectx-ethernet
Only enable jumbo frames when the complete path supports the same MTU.
Step 10: Check Driver, Speed, and FEC
Display the ConnectX driver and firmware:
ethtool -i ens5f0np0
Inspect the physical link:
ethtool ens5f0np0
A ConnectX-7 400GbE link may report:
Speed: 400000Mb/s
Link detected: yes
A ConnectX-8 800GbE link may report:
Speed: 800000Mb/s
Link detected: yes
Check FEC:
ethtool –show-fec ens5f0np0
Inspect port counters:
ethtool -S ens5f0np0
ip -s link show ens5f0np0
Avoid forcing the speed with ethtool -s unless the ConnectX NIC, switch, optics, lane structure, and FEC settings are confirmed to match.
ConnectX-7 Ethernet Compatibility
ConnectX-7 is commonly used for 400GbE, 200GbE, 100GbE, and supported breakout configurations.
For a stable Ethernet link, confirm:
- The switch port is configured for Ethernet.
- Both ends use the same speed.
- The transceiver supports the same lane structure.
- FEC settings match.
- The breakout configuration is correct.
- The optical interface and fiber type are compatible.
A 400G port cannot automatically communicate with four independent 100G endpoints unless the switch, cable, and port configuration support the required breakout mapping.
ConnectX-8 Ethernet Compatibility
ConnectX-8 introduces 800G-class networking and stricter physical-layer requirements.
A full 800G link may require:
- A PCIe Gen6-class server
- A correctly configured ConnectX-8 port
- An 800G Ethernet switch port
- Compatible OSFP-RHS optics or AOC
- Matching electrical lane rates
- Correct FEC and fiber type
- Suitable power and cooling
A ConnectX-8 card may operate in a PCIe Gen5 server, but the host bus can limit full 800G throughput.
Do not assume that every 800G OSFP module works in every OSFP cage. Confirm:
- OSFP-RHS versus OSFP-IHS
- Single-port versus twin-port construction
- Module power class
- Electrical lane rate
- Optical specification
- NIC and switch compatibility
Full ConnectX-8 performance requires an end-to-end 800G-capable chain, from the host PCIe interface to the switch port.
Step 11: Verify RoCE v2
After assigning an IP address, inspect the GID entries:
show_gids
Alternatively:
grep -H . \
/sys/class/infiniband/mlx5_0/ports/1/gid_attrs/types/*
Possible entries include:
RoCE v1
RoCE v2
Check the RDMA_CM mode:
cma_roce_mode -d mlx5_0 -p 1
To select RoCE v2:
sudo cma_roce_mode -d mlx5_0 -p 1 -m 2
The commonly used values are:
- 1 for RoCE v1
- 2 for RoCE v2
The correct utility is cma_roce_mode, not cma_core_mode.
Remember that this command selects the preferred RoCE GID type for RDMA_CM applications. It does not change the physical port from InfiniBand to Ethernet.
Step 12: Test Ethernet and RDMA Connectivity
Test standard Ethernet connectivity:
ping -c 4 192.168.10.20
Test TCP throughput with iperf3.
On the remote server:
iperf3 -s
On the ConnectX host:
iperf3 -c 192.168.10.20 -P 16
A single TCP stream will usually not saturate a 400G or 800G connection.
For RDMA testing, use tools such as:
rping
ib_write_bw -R
ib_read_bw -R
Performance testing should also consider:
- PCIe link width
- NUMA placement
- CPU affinity
- Message size
- MTU
- Queue count
- Switch QoS
- Congestion control
Common Problems After Switching ConnectX Modes
Ethernet Mode Is Active, but the Link Is Down
Possible causes include:
- The switch port is still configured for InfiniBand.
- The two ends use different speeds.
- The breakout configuration is incorrect.
- FEC settings do not match.
- The transceiver is unsupported.
- The connector or fiber polarity is wrong.
Check:
ethtool ens5f0np0
ethtool –show-fec ens5f0np0
dmesg | grep -i mlx5
LINK_TYPE Is Missing
Possible reasons include:
- The ConnectX card is Ethernet-only.
- The card is InfiniBand-only.
- The wrong MST device was selected.
- The firmware does not expose VPI settings.
- ConnectX-8 requires a model-specific configuration.
Verify the complete ordering part number and firmware documentation.
ConnectX-8 Runs at 400G Instead of 800G
Check for:
- A PCIe Gen5 host limitation
- A dual-400G port configuration
- A 400G cable or transceiver
- A switch port limited to 400G
- An incorrect port-width setting
- NDR rather than XDR-rated connectivity
The ConnectX-8 adapter alone cannot create an 800G link. Every component in the path must support 800G.
IP Traffic Works, but RoCE v2 Does Not
Check:
- GID table and GID type
- VLAN and routing
- MTU
- PFC and ECN
- Traffic class
- Firewall settings
- RDMA driver versions
- Switch QoS configuration
ConnectX-7 or ConnectX-8: Which Should You Use?
Choose ConnectX-7 when:
- The server uses PCIe Gen5.
- The fabric is based on 400G.
- The cluster uses H100, H200, or B200 systems.
- Existing 400G optics need to be reused.
- Cost and mature availability are priorities.
- The workload does not require 800G.
Choose ConnectX-8 when:
- The server supports PCIe Gen6-class bandwidth.
- The target fabric is 800G.
- The deployment uses B300, GB300, or newer GPU systems.
- AI training performance is limited by inter-node bandwidth.
- The switch fabric and optics support 800G.
- Long-term infrastructure planning justifies the upgrade.
ConnectX-7 remains the practical choice for mature 400G AI, HPC, storage, and cloud networks. ConnectX-8 is better suited to new 800G AI factories where the entire server-to-switch path can use the additional bandwidth.
Conclusion
Switching a supported NVIDIA ConnectX adapter from InfiniBand to Ethernet is straightforward in principle: identify the device, change the link type with mlxconfig, reboot the system, verify the Ethernet link layer, and configure the Ethernet and RoCE v2 settings.
For ConnectX-7, the conventional LINK_TYPE_P1 and LINK_TYPE_P2 workflow is usually sufficient.
For ConnectX-8, the same basic concept applies, but the adapter may also require model-specific port-splitting, physical-function, or port-layout settings. The correct process depends on whether the card uses a single OSFP-RHS port, dual QSFP112 ports, one 800G link, or two 400G links.
The most important rule is to validate the complete connection. The ConnectX NIC, server PCIe bus, switch port, cable, transceiver, lane structure, FEC, and RoCE configuration must all match. A correct firmware setting cannot compensate for an incompatible 400G or 800G physical link.
FAQ
Can every ConnectX-7 and ConnectX-8 card switch between InfiniBand and Ethernet?
No. Only supported VPI or otherwise reconfigurable models can switch protocols. Verify the complete adapter ordering part number and available mlxconfig settings.
What does LINK_TYPE_P1=2 mean?
It configures Port 1 of a supported ConnectX VPI adapter for Ethernet. A value of 1 normally represents InfiniBand.
Can I use the same command on ConnectX-7 and ConnectX-8?
Sometimes, but not always. ConnectX-8 may require additional port-layout or port-splitting settings. Check the exact adapter model before applying changes.
Does switching ConnectX to Ethernet automatically enable RoCE v2?
No. Ethernet mode enables the Ethernet link layer. RoCE v2 also requires an IP address, valid GID entries, RDMA software, and suitable network QoS.
Does ConnectX-8 require PCIe Gen6?
ConnectX-8 may operate in a compatible PCIe Gen5 server, but full 800G throughput generally requires sufficient PCIe Gen6-class host bandwidth.
Can ConnectX-8 reuse ConnectX-7 optics?
Some 400G cables or optics may be reusable when ConnectX-8 operates at 400G. Full 800G operation requires compatible 800G optics or cables.
How do I verify Ethernet mode?
Run:
cat /sys/class/infiniband/mlx5_0/ports/1/link_layer
The expected result is:
Ethernet
Why is the ConnectX link still down after switching modes?
The most common causes are an incorrect switch-port mode, speed mismatch, unsupported optics, incorrect breakout configuration, or FEC mismatch.
Related Products:
-
 NVIDIA ConnectX-8 C8180 (900-9X81E-00EX-ST0) HHHL SuperNIC, 800Gbs XDR IB & Ethernet, Single-cage OSFP, PCIe 6 x16 with x16 PCIe Socket Direct,Tall bracket
$1980.00
NVIDIA ConnectX-8 C8180 (900-9X81E-00EX-ST0) HHHL SuperNIC, 800Gbs XDR IB & Ethernet, Single-cage OSFP, PCIe 6 x16 with x16 PCIe Socket Direct,Tall bracket
$1980.00
-
NVIDIA B3140H BlueField-3 8 Arm-Cores SuperNIC, E-series HHHL, 400GbE (Default Mode)/NDR IB, Single-port QSFP112, PCle Gen5.0 x16, 16GB Onboard DDR, Integrated BMC, Crypto Disabled
$4390.00
-
NVIDIA NVIDIA(Mellanox) MCX515A-CCAT SmartNIC ConnectX®-5 EN Network Interface Card, 100GbE Single-Port QSFP28, PCIe3.0 x 16, Tall&Short Bracket
$715.00
-
NVIDIA NVIDIA(Mellanox) MCX653106A-ECAT-SP ConnectX-6 InfiniBand/VPI Adapter Card, HDR100/EDR/100G, Dual-Port QSFP56, PCIe3.0/4.0 x16, Tall Bracket
$1100.00
-
NVIDIA NVIDIA(Mellanox) MCX653105A-ECAT-SP ConnectX-6 InfiniBand/VPI Adapter Card, HDR100/EDR/100G, Single-Port QSFP56, PCIe3.0/4.0 x16, Tall bracket
$965.00
-
NVIDIA NVIDIA(Mellanox) MCX516A-CCAT SmartNIC ConnectX®-5 EN Network Interface Card, 100GbE Dual-Port QSFP28, PCIe3.0 x 16, Tall&Short Bracket
$985.00
-
NVIDIA MCX623106AN-CDAT SmartNIC ConnectX®-6 Dx EN Network Interface Card, 100GbE Dual-Port QSFP56, PCIe4.0 x 16, Tall&Short Bracket
$1200.00
-
NVIDIA NVIDIA(Mellanox) MCX653105A-HDAT-SP ConnectX-6 InfiniBand/VPI Adapter Card, HDR/200GbE, Single-Port QSFP56, PCIe3.0/4.0 x16, Tall Bracket
$1400.00
-
NVIDIA NVIDIA(Mellanox) MCX653106A-HDAT-SP ConnectX-6 InfiniBand/VPI Adapter Card, HDR/200GbE, Dual-Port QSFP56, PCIe3.0/4.0 x16, Tall Bracket
$1600.00
-
NVIDIA NVIDIA(Mellanox) MCX75510AAS-NEAT ConnectX-7 InfiniBand/VPI Adapter Card, NDR/400G, Single-port OSFP, PCIe 5.0x 16, Tall Bracket
$1650.00