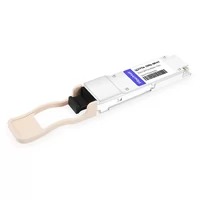
The 200G HDR QSFP56 SR4, more formally known as 200G QSFP56 Short Reach 4-channel, is a high-speed, high-density transceiver module designed for high-performance data center applications. “200G” refers to its data transmission speed, capable of up to 200 Gigabits per second. “HDR” stands for High Data Rate, a term often used in high-performance computing (HPC) network technology related to InfiniBand, denoting its high bandwidth capabilities. QSFP56” indicates that it conforms to the Quad Small Form-factor Pluggable standard, with 56 Gb/s per channel, and “SR4” denotes that it uses Short Reach optics intended for short-distance transmissions across 4 channels.
This transceiver module can significantly improve the efficiency of data transfers produced by servers, storage, and networking devices in data-intensive environments. It is primarily used for transmitting data across short distances within a data center or similar high-bandwidth environment, typically up to 100 meters over multi-mode fiber (MMF).
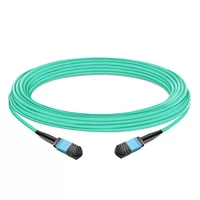
Three main pieces of equipment are required to use a 200G HDR QSFP56 SR4 (compatible with MMA1T00-HS) transceiver module: the transceiver itself, a compatible switch or network card, and an appropriate fiber optic cable (usually multimode because SR denotes short reach intended for data center use).
Here’s a step-by-step to guide you on how to use this transceiver:
Compatibility Check: Confirm that your networking equipment (network cards, switches, routers) supports the 200G HDR QSFP56 SR4 transceivers. This is a crucial step because not all networking devices are compatible with all types of transceiver modules.
Installation: Carefully insert the transceiver module into a suitable port in your networking device, such as a switch or network card. The QSFP56 transceivers have a compact factor that allows for denser port configuration on networking gear.
Cable Connection: Connect a compatible multi-mode fiber optic cable to the transceiver. The other end of this cable should be connected to the corresponding transceiver in the device you wish to communicate with. These transceivers typically use MTP/MPO connectors for their fiber connections, which support simultaneous transmission and receipt of data.
Verifying the link: Once everything is connected, you should be able to power on your devices and verify that the link between the machines is operational. This can be achieved by clicking on your device manager and validating that the status of the port to which you installed your transceiver is up.
Configuration: Depending on your specific networking requirements, you might need to configure the transceiver settings within the operating system of your server or switch. This could involve setting data rates, error correction settings, and other specifics for your networking environment.
Related Products:
-
 QSFP56-200G-SR4M 200G QSFP56 SR4 PAM4 850nm 100m MTP/MPO APC OM3 FEC Optical Transceiver Module
$139.00
QSFP56-200G-SR4M 200G QSFP56 SR4 PAM4 850nm 100m MTP/MPO APC OM3 FEC Optical Transceiver Module
$139.00
-
NVIDIA(Mellanox) MMA1T00-VS Compatible 200G Ethernet QSFP56 SR4 PAM4 850nm 100m MTP/MPO APC OM3 FEC Optical Transceiver Module
$139.00
-
NVIDIA(Mellanox) MMA1T00-HS Compatible 200G Infiniband HDR QSFP56 SR4 850nm 100m MPO-12 APC OM3/OM4 FEC PAM4 Optical Transceiver Module
$139.00
-
5m (16ft) 12 Fibers Female to Female MPO Trunk Cable Polarity B LSZH OM3 50/125 Multimode Fiber
$26.00